By measuring and setting the coefficient K(Ve) (leak coefficient) required to convert differential pressure to flow rate, the leak unit can be changed from Pa to mL / min.
Set the Timers
Manually Set the Timers
For Intelligent 2 Pneumatic Circuit:
- 1) Enter 40 (s) for Pressurization (CHG).
- 2)Enter 30 (s) for Equalization (BAL1).
- 3)Enter 5 (s) for Stabilization (BAL2).
- 4)Enter 2 (s) for Detection (DET).
For Intelligent 1 Pneumatic Circuit:
- 1)Enter 60 (s) for Pressurization (CHG).
- 2)Enter 0.5 (s) for Balance Delay (DL1).
- 3)Enter 30 (s) for Stabilization (BAL2).
- 4)Enter 2 (s) for Detection (DET).
Use the Automatic Setup
- 1)Pressurization (CHG) automatically set.
- 2)Equalization (BAL1) automatically set.。
- 3)Stabilization (BAL2) automatically set.
- 4)Enter 2 (s) for Detection (DET).
For more accurate calculation of Pressurization time and Stabilization time, click here
Set the Test Pressure
Set the test pressure, upper and lower limits, etc. based on your test specifications. If you use an E/P regulator, the pressure will be adjusted by the value entered. If you use a precision regulator, adjust the pressure to the set pressure.
How to set test pressure for LS-R902 E/P regulator
How to set test pressure for LS-R700
Check the Leak Unit
Before measuring K(Ve), be sure to set the leak unit to Pa.
Check the Sealing/Repeatability
Perform leak test three times on non-leaking works to confirm that there are no leaks in the machine, fixture, piping, etc.
Target for “no leak”: Reading = 5 Pa to 20 Pa (with repeatability)
* It depends on the internal volume of the work and the specifications.
Check the Correct “Fail” Judgments
Perform leak test twice on leaking (large leak) works.
Criteria for a “correct” Fail judgment: There is a clear difference from the value displayed when there is no leak.
K(Ve) Automatic Setup
Perform K(Ve) Automatic Setup with a non-leaking work to obtain the K(Ve) coefficient.
Convert from Differential Pressure Unit to Flow Unit
The amount of change in differential pressure due to leak varies depending on the internal volume of the entire measurement system, including the work, leak tester and piping, as well as the measurement time.
The Air Leak Tester uses a coefficient called Equivalent Internal Volume (Ve), which takes into account the effect of pressure fluctuation factors (volume change due to internal pressure of the work and differential pressure sensor) in the entire system, to convert the differential pressure to flow rate and display in units of (mL/min, etc.).
Measuring the Equivalent Internal Volume (Ve) is called K(Ve) Automatic Setup or Leak Calibration.
Depending on the model of Air Leak Tester, the K(Ve) value can be measured automatically by the tester using a Leak Master or Auto Leak Calibrator.
Leak Calibration Using Leak Master

- Set a non-leaking work.
- Make sure the leak unit is Pa: Settings > Advanced Settings > Unit > Leak Unit
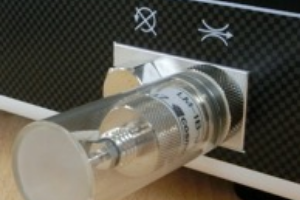
- Remove the sealing plug of the calibration port and connect the Leak Master.
- Make sure Leak Master is selected as Calibrator: K(Ve) > K(Ve) Settings > Basic > Calibrator
- Enter the leak of the connected Leak Master: K(Ve) > K(Ve) Settings > Basic > Leak Master Flow Rate [mL/min]
- Tap Back to return to the K(Ve) menu and open the K(Ve) Automatic Setup screen. Tap Start to start the K(Ve) Automatic Setup. When completed, the K(Ve) value will be displayed.
- Remove the Leak Master from the calibration port and attach the sealing plug firmly.
- Leak Calibration
- Watch the video (YouTube)

- Set a non-leaking work.
- Make sure the leak unit is Pa: Settings > Advanced Settings > Unit > Leak Unit
- Make sure Leak Master is selected as Calibrator: K(Ve) > K(Ve) Settings > Basic > Calibrator
- Enter the leak of the connected Leak Master: K(Ve) > K(Ve) Settings > Basic > Leak Master Flow Rate [mL/min]
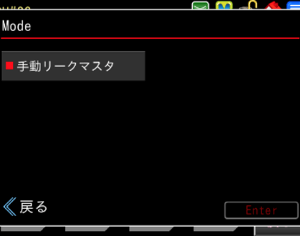
- Tap Back to return to the K(Ve) menu and open the K(Ve) Automatic Setup screen. Tap Mode to set the Manual L/M.
- Tap Back to return to the K(Ve) Automatic Setup screen and tap Start to begin the K(Ve) Automatic Setup.
- After 2 phases of measurements, the tester enters standby mode. Remove the sealing plug from the calibration port and connect the Leak Master.
- Tap Start to resume the K(Ve) Automatic Setup. When finished, the K(Ve) value will be displayed.
- Remove the Leak Master from the calibration port and attach the sealing plug firmly.
- Before tapping Start in 6 above, remove the sealing plug from the calibration port and connect the Leak Master.
- Tap Start to start the K(Ve) Automatic Setup. When finished, the K(Ve) value will be displayed.
- Remove the Leak Master from the calibration port and attach the sealing plug firmly.

- Set a non-leaking work.
- Make sure the leak unit is Pa: Main Menu > Settings > Advanced Settings > Unit > Leak Unit
- Remove the sealing plug of the calibration port and connect the Leak Master.
- Make sure Leak Master is selected as Calibrator: Main Menu > K(Ve) > K(Ve) Settings > Basic Settings > Calibrator
- LM Flow Rate [mL / min]
Enter the leak of the connected Leak Master. - Return to the K(Ve) Automatic Setup and tap Start to start K(Ve) Automatic Setup. When finished, the K(Ve) value will be displayed.
- Remove the Leak Master from the calibration port and attach the sealing plug firmly.
- Leak Calibration
- Watch the video (YouTube)

- Set a non-leaking work.
- Make sure the leak unit is Pa: Main Menu > Settings > Advanced Settings > Unit > Leak Unit
- Make sure Leak Master is selected as Calibrator: Main Menu > K(Ve) > K(Ve) Settings > Basic Settings > Calibrator
- LM Flow Rate [mL / min]
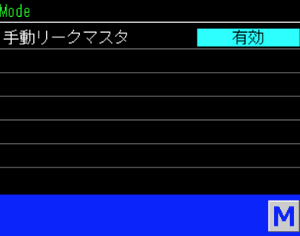
Enter the leak of the connected Leak Master. - Return to the K(Ve) Automatic Setup screen and enable Manual L/M in Mode.
- Return to the K(Ve) Automatic Setup screen and tap Start to start the K(Ve) Automatic Setup.
- After 2 phases of measurements, the tester enters standby mode. Remove the sealing plug from the calibration port and connect the Leak Master.
- Tap Start to resume the K(Ve) Automatic Setup. When finished, the K(Ve) value will be displayed.
- Remove the Leak Master from the calibration port and attach the sealing plug firmly.
- Before tapping Start in 6 above, remove the sealing plug from the calibration port and connect the Leak Master.
- Tap Start to start the K(Ve) Automatic Setup. When finished, the K(Ve) value will be displayed.
- Remove the Leak Master from the calibration port and attach the sealing plug firmly.
Before leak calibration, run a leak test in a non-leaking condition to sample a drift value to be used as a compensation value in leak calibration.
- Set a non-leaking work. Put sealing plugs on both CAL ports.
- Run a leak test in normal Measurement mode. When a GO judgment is made, the differential pressure in the DET is programmed as the compensation value.
- In Measurement mode, press the SHIFT key to display SFt on the leak rate indicator.
- Press the CAL./COMP. key.
- CAL then vE will appear on the leak indicator, and the calculated equivalent internal volume will be displayed on the leak limit indicator in unit of L. The displayed indication blinks.
【Note】
If the equivalent internal volume is known, the ▲UP and DOWN▼ keys allow manual entry. Press the ENTER key to complete the entry and press the STOP key to return to Measurement mode. - Pressing the ENTER key clears the display of the equivalent internal volume and displays the value of Leak Master on the LO limit indicator.
Enter the value of Leak Master to the Leak rate LO limit indicator using the ▲UP and DOWN▼ keys.
Note that unless the keyboard is unlocked, the value cannot be entered.
The unit is mL / min. Press the SHIFT key to move the decimal place of the current significant digits to left. - Press the ENTER key to complete the entry.
- Press the START key to start sampling the differential pressure.
- After sampling, the tester compensates the sampled differential pressure by the pre-measured drift value and displays the value on the leak rate indicator as an equivalent internal volume.
The pre-measured drift value can be viewed on the leak rate indicator by pressing the RIGHT ► key for 1 second or longer. - Press the STOP key to change the unit to mL/min and return to Measurement mode.
- Leak Calibration
- Watch the video (YouTube)
Check the K(Ve) Value
Check that the measured K(Ve) value is correct.
Change the leak unit to mL/min.
Measure a good work and check the leak (mL/min).
Connect the Leak Master to the calibration port on the front panel and measure the same good work in the same manner while the Leak Master is leaking to check the leak rate (mL/min).
When the leak displayed on the leak tester is close to the total leak of the good work and the Leak Master, then the K(Ve) has been measured correctly. If there is a large difference, the K(Ve) was not measured correctly, so measure the K(Ve) again.
Check correct “Fail” Judgments
Set the leak limits (mL / min) based on your test specifications.
Perform leak tests using leaking works or Leak Master and confirm the leak tester correctly makes Fail judgments.
How to setleak limits in detail for LS-R902
How to set leak limits for LS-R700